

iTunes is the official tool by Apple to back up, manage, or restore data of iOS devices on your computer. If you are running low on space on your iPhone and can’t install the latest iOS update, iTunes can be a helpful solution. Most people don’t have enough room on iCloud to store all their data. iTunes is a great option for making a backup of your iPhone. Considering the backups can take up to hundreds of GBs. Your C drive, or the primary drive, can sometimes fall short of space. This guide will provide a working solution to change the iTunes backup location to another drive on your computer or an external hard disk.
Itis surprising that Apple hasn’t provided an option to change the default location for storing backups on a PC when using iTunes. Most iPhone users don’t buy iCloud storage to back up their pictures and data because it is expensive. The most convenient way to back up is via iTunes.
Usually, people have their operating system installed in the primary drive, which is usually the C drive. Or people have the operating system installed in SSD drives, usually 128 or 256GB. This drive is only used for operating purposes, not for storing data. I also have the same case. I have an SSD as the primary drive, which is over 100 GB, and the iPhone backup I want to store is well over 100 GB. So I tried to store the backups on the secondary drive, which is one terabyte.
Change iTunes Backup Location to Another Drive without any Third-Party Software:
Since there is no option to change the location of backups in iTunes. We are going to get the job done on the file systems. First, we will create a file junction, so any files stored in the C drive actually get saved in the specified directory. This directory can be located anywhere, such as on your external hard drive or any other directory on your computer.
- Let’s start with the guide. First, navigate to the folder where all your iTunes backups are stored. Initially, they were being stored in C Drive -> Users -> “Current User” -> Apple -> MobileSync-> Backup. In the new versions of iTunes, this location has been changed. Now the backups are stored in C Drive ->Users -> “Current user” -> AppData -> Roaming -> Apple Computer -> MobileSync -> Backup.

- The AppData folder is hidden, so you would first need to unhide the hidden files. You can do this by going to the View in the toolbar in File Explorer. On the top, in the toolbar, you would see Hidden Items. Check it. Then, you will be able to see the AppData folder.
- In the backup folder, you would already see the backup of your iPhone if you have made one. So now you can either change the name of the backup folder to something else. Or you can delete it if you can make the backups later on.
- Once you have renamed the backup folder, it’s time to create a junction folder, which will allow us to change the iTunes backup location.
- Move to the directory where you would like to store the future backups of iPhones via iTunes. Create a folder; let’s call it “AppleBackup.”
- Now open the Command Prompt. You can click the Windows button, type “command prompt” in the search field, and then open it.
- Now you would have to add the following command to create a junction:
- mklink /J “C:\Users\%USERPROFILE%\AppData\Roaming\Apple Computer\MobileSync” “E:\AppleBackup”
- While %USERPROFILE% would fetch the current user’s name, you can also enter it manually.
- Once done, you will get a notification like the one below:
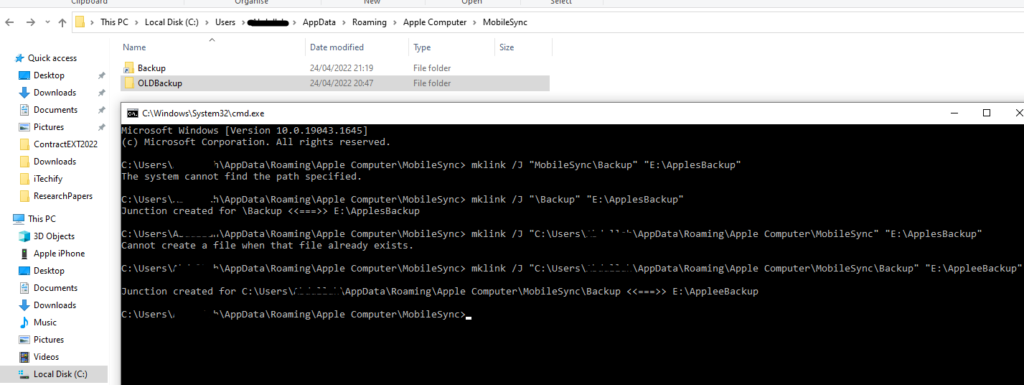
- Additionally, you will see a folder shortcut named ‘Backup’ in the folder where your backups were previously stored, as shown in the screenshot above.
- If you already had backups in the old backup folder, you can move them to this shortcut folder. All the files in this folder will eventually be stored in the specified directory when creating the junction.

- Once done, you have successfully changed the iTunes backup location on your computer. This guide is only valid for computers running on Windows operating systems.

Now you can open iTunes and start backing up your iOS devices. The backups will now be stored in the specified directory. You can navigate to that directory and see for yourself. You would find the backups there.
That’s all from our side. I hope this guide has been helpful to you. This guide is self-implemented and works even after the new and updated iTunes. So, I can vouch for it. If you have any questions or queries regarding the guide above, please don’t hesitate to ask. Feel free to contact us via Social Media or in the comments below.


")


