

Today, we will address the Kernel Panic upload mode error that occurs when you reboot your Android phone or perform a factory reset. This issue is also common in Samsung devices after a kernel error.
A “Kernel Panic Upload Mode” error on a Samsung phone typically indicates a critical issue at the kernel level of the operating system. Here are some potential reasons for encountering this error:
I encountered this error when I attempted hard to reset my Galaxy Note 4 from the recovery menu. First, I wasn’t sure what it meant. It primarily arises when the Firmware is not working correctly. There is a problem with the Firmware, or it has malfunctioned. My phone would reboot at random intervals after I encountered this error. It was troublesome for me. After each reboot, the screen will display this error.
Note: This guide applies to all Samsung Galaxy Phones running on the Android operating system.
Kernel Panic Upload Mode Error Fix for Android Phone:
I tried several things to fix this issue. I will list them all in this post. Perhaps they can help you select the correct kernel panic upload mode error. Several reasons can be causing this problem. It can be either the Firmware or an app.
- One solution is to uninstall “Advanced Task Manager.” The task manager sometimes malfunctions and starts ending wrong processes, which causes the kernel to crash. Uninstall any task killer or system cleaner app that claims to free up your phone’s memory. Instead, use the Android default task manager.
Clear Cache Partition from the Recovery Menu of your Android phone:
If the above solution doesn’t help. Then go to the recovery menu and clear the cache of your phone by following the steps below:
- First of all, turn off your Android phone.
- Once it’s completely turned off, enter the recovery menu by pressing the Volume Up, Home, and Power buttons simultaneously. Keep holding the buttons until you see the Android figure in the background.
- Now, in the recovery menu. Locate Wipe Cache Partition. Use the volume buttons to navigate to it.
- Now, press the power button to select it.
- After wiping the cache partition.
- Select Reboot system now.
Cache allocated to apps can sometimes cause issues. Clearing it enhances your phone’s performance and resolves any unusual behavior.
Soft reset if your phone is stuck at kernel panic upload mode error:
If your phone is stuck and unresponsive. The solution to that is a soft reset. The soft reset does not delete any data on your phone. So do not worry.
- In Samsung smartphones, you can soft reset by pressing and holding the Power and Volume Down buttons.
- In the new Galaxy S and Note series models, in order to soft reset your phone. First, connect the phone with a Type-C USB cable. Then press and hold the Power and Volume down buttons.
- Now, your phone will restart, and it will function properly.
If clearing the cache and performing a soft reset don’t fix the problem, you may need to factory reset your phone. First, follow the steps above to go to the Recovery menu and select Factory Reset/Hard Reset. This will delete all the data on your phone. Ensure you create a backup of your phone using this guide before performing a factory reset.
Flash Stock Firmware on your Samsung Galaxy Phone to fix the Kernel Panic Upload mode error:
Suppose you are getting this error on your Samsung Galaxy phone. Then, use the guide below to install fresh Firmware on your phone if the software is causing the problem. Installing new software/firmware will eliminate kernel panic upload mode errors once and for all.
In this guide, I will demonstrate, step by step, how to fix a Kernel panic in upload mode by flashing stock firmware on your Android phone.
Prerequisites:
- Download ODIN v3.10.7 from here.
- Download Firmware for your Samsung Galaxy phone from SamMobile. And extract it on your PC.
- Go to the link above
- Enter your phone model.
- Search for the Firmware.
- Select the Firmware that matches your country and brand (e.g., T-Mobile, Verizon, etc.).
- If your phone is unbranded, you can select any unbranded firmware.
- Download Samsung Drivers for Windows. (The link to download the file is under the main heading.) These drivers must be installed on your PC and are essential for your PC to recognize your device.
- You will need a computer for this solution.
Selecting the correct Firmware is very important. If your phone is carrier-unlocked and has no carrier branding, you can download Firmware for any country that is not branded. To check the brand, look for the logo of a carrier (such as Verizon or T-Mobile) that appears when you reboot your phone. If your phone is not branded, you can flash the ROM of any country that is not carrier-specific. Make sure you don’t flash an unbranded ROM on a branded phone. However, it is recommended that you find the same Firmware as the one that was installed on your phone before it got bricked. Suppose you found the same Firmware as the one installed on your phone. Your data won’t be deleted.
Follow the steps to install the Firmware on the Samsung Galaxy Phone:
- First, download ODIN on your PC.
- Next, install Samsung USB drivers for Windows on your PC or laptop.
- Now, turn off your phone.
- Get it into Download mode.
- Press the Volume Down, Power button, and Home Buttons simultaneously. Keep on holding till you see a warning.
- Press the Volume Up button to continue.
- Now open ODIN on your Windows PC.
- Connect your phone to your PC using a USB data cable. ID:COM will turn blue. This indicates that your phone is connected and recognized by your PC. If your phone is not recognized, ensure that you have installed the correct Samsung drivers on your computer.
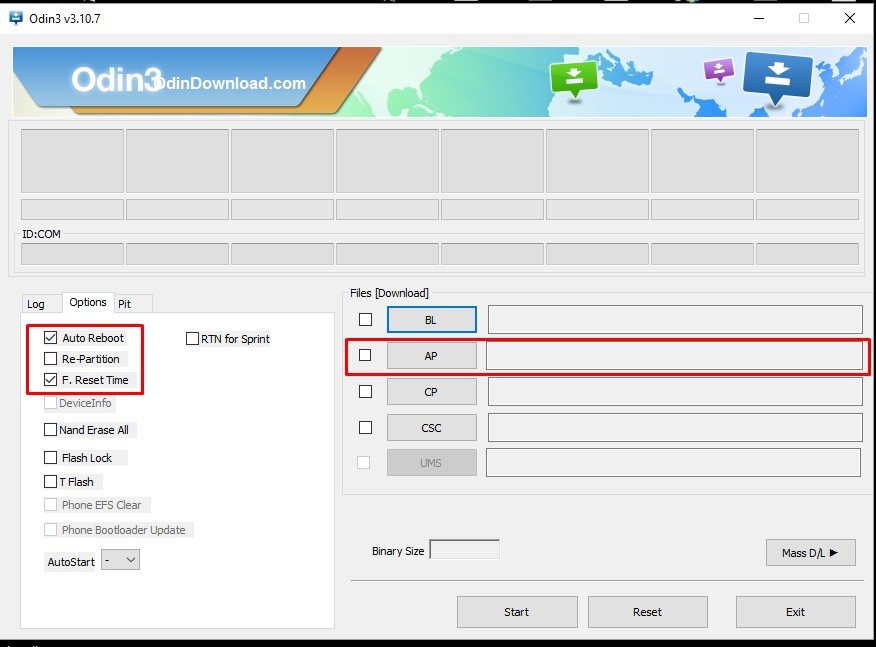
- Click on AP or, in some ODIN versions, PDA.
- Select the stock firmware with (.MD5 file extension)that you downloaded from Sammobile.
- Ensure That Only ‘Auto Reboot’ and ‘F. The Reset Time’ option is checked in the settings, as shown in the screenshot below.

That’s it. Click on Start and wait for 10 minutes. Now, ODIN will flash Stock firmware on your Galaxy phone. Your phone will reboot automatically after the flashing process is complete.
Note: If the Firmware you downloaded extracts more than one file, then follow the three additional steps below:
- Put the BL file in the BL tab.
- Next, select the CP tab and select the CP file.
- Finally, select the CSC tab and select the HOME_CSC file.
If the flashing is unsuccessful, try again using a different version of Odin and ensure you are using the original data cable for your Samsung smartphone.
Reasons for Kernel Panic Error on Samsung Smartphones:
- Android phones can experience glitches or corruption in their operating system. This can happen due to various reasons, such as incomplete updates, incompatible apps, or malware.
- Sometimes, hardware components in an Android can malfunction, leading to kernel panics. This could be due to issues with the CPU, RAM, storage, or other critical components.
- If your Galaxy phone has been rooted or modified (such as by flashing custom ROMs or kernels), it can sometimes lead to system instability, causing kernel panics.
- Certain apps may not be compatible with the phone’s hardware or software version, causing conflicts that result in a kernel panic. Additionally, if an app has bugs or is poorly coded, it could lead to system instability.
That’s all on how to fix the kernel panic upload mode error on Android phones. If you have any questions or queries regarding any of the methods above, please do not hesitate to ask. Feel free to ask me in the comments. However, please provide us with feedback on which approach helped you resolve this issue.


")


